Table of Contents
ToggleInstalling a Nest thermostat yourself can save hundreds in contractor fees, but getting the wiring right is non-negotiable, mix up a single wire and you’re looking at a dead heating system or a fried circuit board. Understanding the Nest thermostat wiring diagram and how different wire colors map to your HVAC system is the foundation of a successful installation. This guide walks you through wire identification, compatibility checks, and the step-by-step process to wire your Nest safely. Whether you’re upgrading an older two-wire system or dealing with a complex multi-stage setup, you’ll find practical, straightforward instructions to get your smart thermostat running.
Key Takeaways
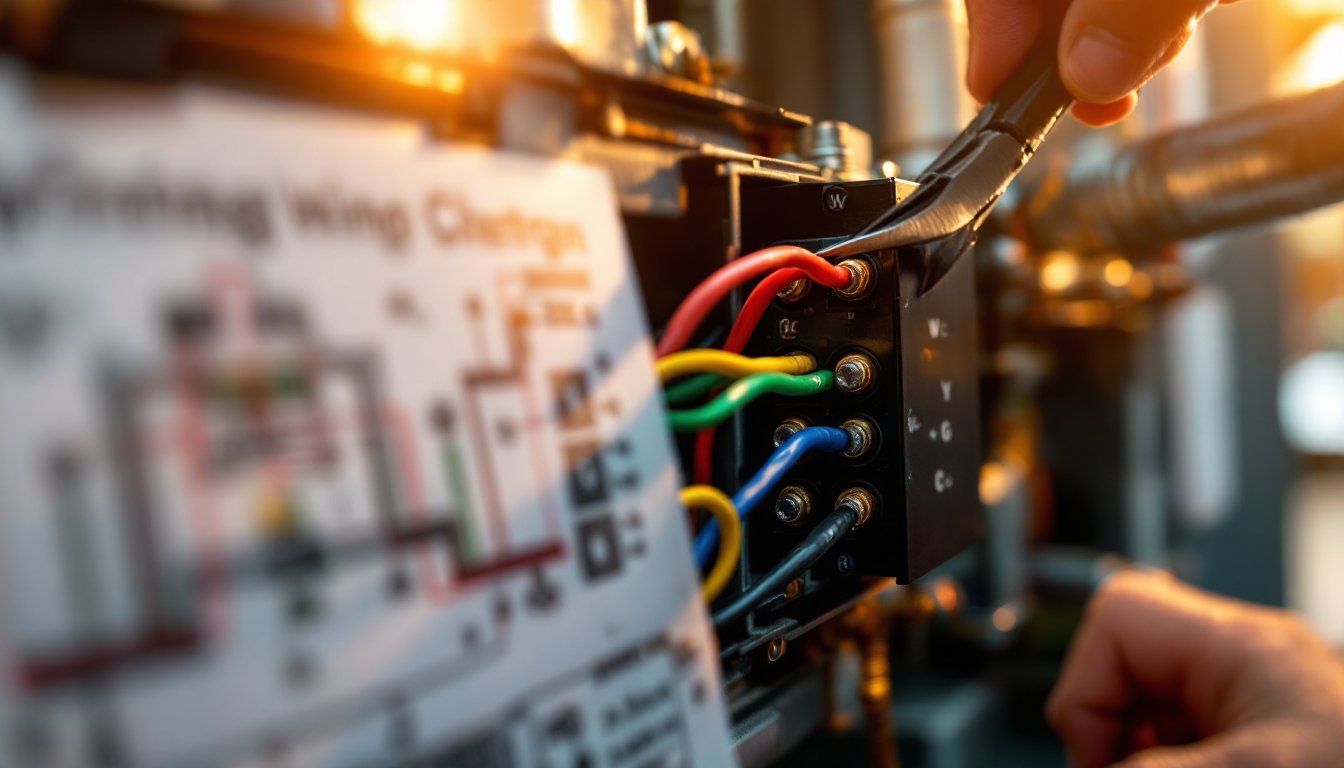
- Understanding the Nest thermostat wiring diagram and color-coded wire functions—red for power, white for heat, yellow for cooling, green for the blower, blue for neutral, and black/orange for heat pump reversals—is essential to avoid system failure or damage.
- Nest thermostat installation requires a C-wire (common return) for reliable operation; if your current system lacks one, you must either run a new wire from the furnace or use a Nest Power Connector accessory.
- Follow the eight-step installation process carefully: turn off power at the breaker, remove the old thermostat, label and document all wires, prepare the mounting bracket, connect wires to the Nest terminal block, secure the unit, restore power, and configure the system through the Nest app.
- Verify HVAC compatibility before starting by confirming your system has a 24-volt transformer, determining your heating and cooling stages, and checking the Nest app compatibility tool with your equipment brand and model.
- Most wiring problems stem from loose terminal connections, mislabeled wires, or improperly seated power lines; troubleshooting involves turning off power, reseating connections, and testing each stage through the Nest app.
- Call a professional HVAC technician if your system has unusual wiring, unfamiliar wire colors, repeated breaker trips, or if multiple heating and cooling stages fail after reseating wires, rather than risk further damage.
Understanding Nest Thermostat Wiring Basics
Common Wire Colors and Their Functions
Your HVAC system communicates through a bundle of color-coded wires running from the furnace or air handler to the thermostat. Learning what each wire does is your first checkpoint, get this wrong and nothing else matters.
Red (Rc or Rh) carries the 24-volt power from the transformer in your HVAC system. Most setups use a single red wire (Rc) for heating and cooling combined, though larger systems might split into separate Rc (cooling) and Rh (heating) lines. Without power, your thermostat is just an expensive paperweight.
White (W) signals the furnace to produce heat. When the thermostat calls for warmth, it sends a signal down the white wire, triggering the heating system. In multi-stage systems, you might see W1, W2, or W3, each controlling progressively higher heating stages.
Yellow (Y) tells the air conditioner to kick in. Like the white wire but for cooling, yellow signals the compressor to start running. In two-stage systems, Y1 handles the first stage and Y2 handles the second.
Green (G) controls the blower fan, which circulates conditioned air through your home. The Nest can turn this on independently, keeping your air moving even when heating or cooling isn’t running.
Blue (C) is the neutral or common return wire, it completes the circuit so current can flow back to the transformer. Not every thermostat needs a C wire, but Nest actually requires one for reliable operation. If your system lacks a C wire, you’ll need to run one from the furnace to the thermostat, or use a Nest Power Connector accessory (though that’s an extra expense and complication).
Black or Orange (O/B) switches the reversing valve in heat pump systems between heating and cooling. If you have a heat pump instead of a traditional furnace and AC split, pay special attention to this wire during installation.
Not all systems use every wire, older homes might run just Rc, W, and Y. Modern multi-zone setups could have six or more. Snap a photo of your current thermostat’s wiring before disconnecting anything. That image becomes your roadmap.
Compatibility Requirements Before Installation
Before you touch a single wire, confirm your HVAC system is actually compatible with Nest. A Nest thermostat works with most traditional forced-air heating and cooling systems, but compatibility depends on having the right wiring and system type.
Your system must include a transformer that supplies 24-volt power to the thermostat wiring. If your current thermostat is powered, you almost certainly have one. Nest won’t work with 12-volt systems or battery-powered-only setups.
Check whether your system is heating only, cooling only, or a combination. Nest handles all three, plus heat pumps and multi-stage systems. What matters is that you have wiring in place (or can run new wire) for each stage your system operates. A two-stage heat pump, for instance, needs W1, W2, Y, and O/B wiring, missing even one can cripple functionality.
The C wire (common) is the single biggest compatibility issue. Nest requires it to function reliably. If your current thermostat doesn’t have a C wire connected, you have two options: run a new wire from the furnace to the thermostat location (often a few hours of work), or purchase the Nest Power Connector as a workaround. Running the wire is cleaner if you have access to your attic or crawlspace: the Power Connector adds cost and takes up space at your furnace.
Check the Nest app or website compatibility tool, input your HVAC equipment brand and model to confirm support. Take a photo of your existing thermostat’s wiring terminal block and compare it against the Nest wiring diagram in the installation guide. If more than one or two wires are unfamiliar, pause and research before proceeding.
Step-by-Step Wiring Installation Process
Materials & Tools You’ll Need
- Nest thermostat unit and mounting bracket
- Small flathead and Phillips screwdrivers
- Voltmeter or multimeter (to verify power is off)
- Small needle-nose pliers (for loosening terminal screws)
- Wire labels or tape (to mark wires before disconnection)
- Drywall anchors (if not mounting over existing hole)
- Drill with bits (if repositioning the thermostat)
Installation Steps
1. Turn off power at the breaker. Locate your HVAC system’s breaker and switch it to the off position. Wait 30 seconds, then use a voltmeter to confirm the thermostat wires are de-energized. Red and black probes touching any two wires should show zero volts. This step isn’t optional, working on live 24-volt circuits risks damage to your new thermostat and potential shock.
2. Remove the old thermostat. Gently pull the faceplate away from the wall to expose the terminal block. Loosen each wire’s terminal screw by a quarter turn. Before pulling any wire free, label it with its color. A piece of masking tape with “R” or “W” written in marker takes seconds and saves massive headaches.
3. Document the wiring. Take a clear photo of the terminal block with all wires still connected. Then, one at a time, loosen each terminal screw and gently pull the wire out. Set the wires aside in a safe spot where they won’t slip back into the wall.
4. Prepare the Nest bracket. The Nest mounting bracket uses either the original thermostat’s backplate hole or requires new holes. If repositioning, use a level to ensure it’s straight. Mark mounting points and drill if needed. Insert drywall anchors if you’re not hitting studs or the original mounting point.
5. Connect wires to the Nest terminal block. This is where the wiring diagram becomes critical. The Nest terminal block is clearly labeled (Rc, W, Y, G, C, O/B) and matches standard thermostat color coding. Insert each wire into its matching terminal and tighten the screw firmly, snug, but not over-torqued. A wire that slips out under vibration causes intermittent heating or cooling failure.
6. Secure the Nest to the bracket. Once all wires are seated, snap or screw the Nest unit onto the mounting bracket according to the manual. Ensure it’s level and sits flush against the wall.
7. Restore power. Return to the breaker panel and switch the HVAC breaker back on. The Nest should power on within 10 seconds, showing the Nest logo. If nothing appears, kill the breaker again, recheck your wire connections, and confirm all screws are tight.
8. Configure in the Nest app. Once powered on, the thermostat guides you through a setup wizard. It asks about your system type (heating only, cooling, heat pump, etc.) and walks you through testing each heating and cooling stage. Don’t skip the test cycles, they confirm every wire is working correctly before you rely on the system for actual temperature control.
Following step-by-step DIY tutorials and video walkthroughs can help you visualize these steps before you start. Many homeowners find watching the Nest installation video alongside the written guide removes guesswork.
Troubleshooting Common Wiring Issues
The Nest app displays error messages and diagnostics that pinpoint wiring problems. Here are the most frequent culprits:
Nest won’t power on. Double-check that the red (power) wire is firmly seated in the Rc terminal. Verify at the breaker panel that power is actually on. If the breaker keeps tripping, you may have a short circuit, kill the breaker, wait five minutes, then try again. If it trips a second time, there’s a fault in the wiring or system: stop and call a technician.
Heating or cooling doesn’t respond. A loose wire connection is the usual suspect. Turn off power, remove the Nest faceplate, and gently tug each wire to confirm it’s seated. Tighten any screw that gives even slightly. If a wire was mislabeled during installation, you’ll notice heating comes on when you call for cooling (or vice versa). Swap the suspected wires, confirm in the app, and test again.
Blower won’t shut off. A stuck G wire connection can cause the fan to run continuously. Try toggling the fan setting in the app from “auto” to “on” and back to “auto” to see if it resets. If that doesn’t work, power down, reseat the green wire, and test.
Nest frequently loses connection to Wi-Fi. This isn’t a wiring issue, but a weak C wire signal sometimes mimics connectivity problems. If you used the Power Connector instead of running a proper C wire, try repositioning the connector or confirming it’s fully seated. A proper C wire run from the furnace eliminates this class of problems entirely.
“No power to W wire” or similar errors in the app. The Nest runs diagnostics and can tell you which specific wire isn’t communicating. Follow the error message, it usually means that particular wire terminal needs to be reseated or tightened. Turn off power, fix it, and restore power to test.
If you’ve reseated wires, confirmed connections, and the error persists, take a photo of your wiring configuration and post it on a home improvement community forum or Nest’s support forum. Often a second pair of eyes spots what you’ve missed.
Safety Considerations and When to Call a Professional
Working with low-voltage thermostat wiring is low-risk compared to panel work or 240-volt circuits, but some precautions matter:
Always kill power at the breaker before touching any wires. Even 24-volt circuits can create sparks if you accidentally short terminals. Use a voltmeter to confirm zero voltage before you start.
Don’t force wire into terminals. If a wire seems stuck or you meet resistance, stop. Stranded copper can fray, and forcing it can damage the terminal block. Loosen the screw a bit more and try again gently.
Run a new C wire if you don’t have one. The Power Connector is a bandage, not a permanent fix. If your home has accessible attic or basement space, running a new thermostat cable from the furnace’s transformer to the thermostat location is a two-to-three-hour project well within DIY reach. This Old House and similar resources have detailed guides on running low-voltage wiring through walls and ceilings.
Call a professional if:
- Your HVAC system has unusual wiring (more than six wires, or unfamiliar wire colors).
- You’re unsure whether your transformer has enough capacity to support the Nest plus existing loads.
- The breaker trips repeatedly or you smell burning insulation anywhere in the system.
- Your system uses a proprietary thermostat connection that doesn’t match standard color-coding.
- You’ve completed installation and multiple stages of heating/cooling still don’t work after reseating wires.
Hiring a licensed HVAC technician costs $150–300 for installation but guarantees compatibility and warranty coverage. For many homeowners, that peace of mind justifies the expense, especially if your system is older or non-standard. There’s no shame in handing off the last mile to a pro, better than troubleshooting a failed installation for weeks.
Conclusion
A Nest thermostat installed correctly transforms home comfort and saves energy, but only if the wiring is right. Master the color-coding, verify compatibility upfront, follow the step-by-step process, and don’t skip the power-on testing phase. Most DIYers succeed on the first try by taking their time and double-checking connections. If you hit a wall, the Nest support team and online forums are responsive. Get it done, step back, and enjoy the smarter home you’ve just created.